Data Import
System > Data > Import
Example 1: Update products
Example 2: Insert Products
Example 3: Insert Products with Images
You able to import data into your WebriQshops store using '.xml' or '.csv' files.
Some of fields are required for a successful import, yet nearly almost all fields are supported, allowing you to determine the level of detail you wish to import.
This is particularly useful when migrating and importing from a different eCommerce platform.
Note
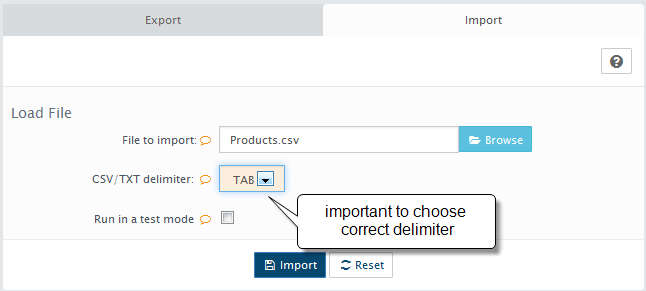
Please select correct CSV delimiter.
You can run import in Test Mode to prevent any unexpected results.
If you import data with table auto-increment index columns provided (example: product_id), default auto action will be update. In case, new inserts required with auto-increment columns values, action insert needs to be specified manually. For example in XML file, you need to add <action>insert</action> for each table or new column in CSV file.
Example 1: Update products
In this example we will show how to easily update your exiting products.
First export it. Go to System->Data->Import/Export. In the Export Tab find Products, click to expand table and select only product_descriptions table.

In the bottom of the page select this export options:
File Format: CSV
CSV/TXT delimiter: TAB
Click Export button.

Then open exported CSV file in CSV editor like OpenOffice Calc, Microsoft Excel etc. Be sure to open file with correct CSV delimiter.

In the opened CSV file easy to update/edit this products fields:
products.model
products.quantity
products.price
products.weight
products.length
products.width
products.height
products.sort_order
product_descriptions[0].name
product_descriptions[0].description
Also You can edit other fields. But You need to know your correct exiting in your data ids/values for this fields:
products.stock_status_id
products.manufacturer_id
products.shipping
products.tax_class_id
and others
Then Import file. Go to System->Data->Import/Export. In the Import Tab select correct File to import and correct CSV/TXT delimiter. Click Import button.

After processing the message will be shown. Normally 0 errors should be displayed.
Update complete.

Example 2: Insert products
Before insert a lot of new products just create sample product in Admin > Catalog > Products and configure it.
Then export to CSV file. Make sure to select required tables like:
product_descriptions
products_to_categories
products_to_stores
or any others tables which one contain needed data for configured sample product.
Then open exported CSV file in CSV editor like OpenOffice Calc, Microsoft Excel etc. Be sure to open file with correct CSV delimiter.
Copy row with sample product to make sure new product will be configured in the same way.
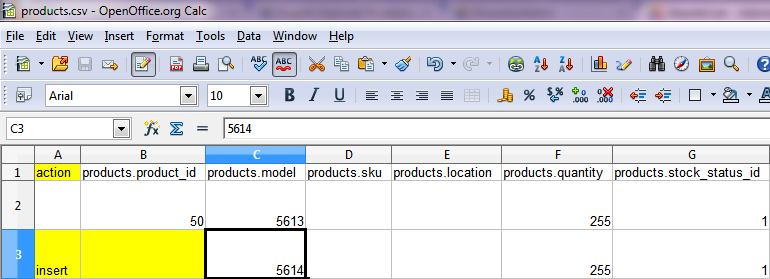
To insert new products using import tool you need to add new column named action in the exported file. See example for CSV file.

Make sure to:
leave empty products.product_id
type insert in the action column
and fill others columns like in exiting sample product.
Then Import file. Go to System->Data->Import/Export. In the Import Tab select correct File to import and correct CSV/TXT delimiter. Click Import button.

After processing the message will be shown. Normally 0 errors should be displayed.

Insert complete. See CSV (TAB delimeted) examples for insert :
Example 3: Insert products with Images
-
1
upload images by ftp to this path ../resources/image/somefolder/
-
2
update permission for this folder to 777 (or 755)
-
3
change/add this columns in your csv file
resource_map[0].resource_id = leave empty
resource_map[0].object_name = products
resource_library[0][0].type_id = 1
resource_descriptions[0][0][0].language_id = 1 (the id of installed language)
resource_descriptions[0][0][0].name = anyname (usually imagefile name)
resource_descriptions[0][0][0].title = leave empty or fill if you need title
resource_descriptions[0][0][0].description = leave empty or fill if you need description for the resource
resource_descriptions[0][0][0].resource_path = somefolder/product_image_1.jpg
in case You have 2 languages installed in your cart add next columns
resource_descriptions[0][0][1].language_id = 9 (the correct id of second installed language)
resource_descriptions[0][0][1].name = anyname (usually imagefile name)
resource_descriptions[0][0][1].title = leave empty or fill if you need it
resource_descriptions[0][0][1].description = leave empty or fill if you need it
resource_descriptions[0][0][1].resource_path = somefolder/product_image_1.jpg
------------------------------------------------------------------------------------
in case If you need to add multiply images to one product please add more columns
resource_map[1].resource_id = leave empty
resource_map[1].object_name = products
resource_library[1][0].type_id = 1
resource_descriptions[1][0][0].language_id = 1 (the id of installed language)
resource_descriptions[1][0][0].name = sometext (any resource name to second image)
resource_descriptions[1][0][0].title = leave empty or fill if you need it
resource_descriptions[1][0][0].description = leave empty or fill if you need it
resource_descriptions[1][0][0].resource_path = somefolder/product_image_2.jpg (path to second image)
same for second language if you have it installed
resource_descriptions[1][0][1].language_id = 9 (the correct id of second installed language)
resource_descriptions[1][0][1].name = sometext (any resource name to second image)
resource_descriptions[1][0][1].title = leave empty or fill if you need it
resource_descriptions[1][0][1].description = leave empty or fill if you need it
resource_descriptions[1][0][1].resource_path = somefolder/product_image_2.jpg (path to second image)
---------------------------------------------------------------------------------------
and to add one more image
resource_map[2].resource_id = leave empty
resource_map[2].object_name = products
resource_library[2][0].type_id = 1
resource_descriptions[2][0][0].language_id = 1 (the id of installed language)
resource_descriptions[2][0][0].name = sometext (any resource name to 3rd image)
resource_descriptions[2][0][0].title = leave empty or fill if you need it
resource_descriptions[2][0][0].description = leave empty or fill if you need it
resource_descriptions[2][0][0].resource_path = somefolder/product_image_3.jpg (path to second image)
resource_descriptions[2][0][1].language_id = 9 (the id of second installed language)
resource_descriptions[2][0][1].name = sometext (any resource name to 3rd image)
resource_descriptions[2][0][1].title = leave empty or fill if you need it
resource_descriptions[2][0][1].description = leave empty or fill if you need it
resource_descriptions[2][0][1].resource_path = somefolder/product_image_3.jpg (path to second image)
You can and more and more images for one product with similar way
products with images CSV Tab delimited example Download
CSV file format
- The first row must include column headers and the column headers must match those given in the documentation.
- Values must be separated by a delimiter, which is expected to be a tab, comma “,” by default, though this can be set during the import process to any other character, so long as you are consistent within your file.
- Each imported item (Products, Category) belongs on its own row
- Some CSV file editor like MS Excel may automaticly change price or date fields format and broke your file.
Troubleshooting
-
1
Allowed memory size of xxx bytes exhausted
Your server may not have enough memory to perform the import. -
2
Import is timing out
Increase the max_execution_time. If its not possible for you to increase the max_execution_time you can either break your CSVs into multiple parts and import each separately -
3
Special / foreign characters imported not properly
The file you are importing must be properly encoded as UTF-8.