Form Handling
WebriQ CMS comes with built-in form handling. Just add a netlify attribute to your form tag and you can start receiving submissions.
NOTE!
It’s a good idea to set a name attribute on the form so you can easily identify which form incoming submissions are coming from.
You can point the action attribute on the form to one of your html pages to show a custom thank-you message on successful form submission.
Here's an example:
<form name="contact" action="thank-you" netlify>
  <p>
    <label>Your Name:</label>
    <input type="text" name="name">
  </p>
  <p>
    <label>Your Email</label>
    <input type="email" name="email">
  </p>
  <p>
    <label>Message</label>
    <textarea name="message"></textarea>
  </p>
  <p>
    <button>Send</button>
  </p>
</form>
Receiving Email Notifications
The simplest way to receive form submissions is to use the Notification Emails in the site admin UI to set up an email.
To configured please follow the guide below.
- 1Login with your account in app.webriq.com/auth/login
- 2Once you're authenticated, click
Manage Sites - 3In the
Site ManagementTab select a site from the list and click the edit action button - 4In the
Settings Box, click More tab and click New Email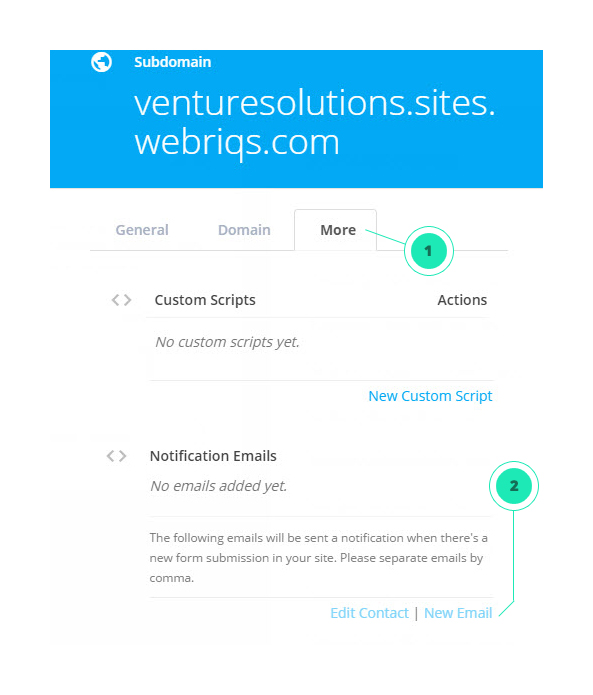
- 5 You can start adding multiple
emailsseparated by a comma. - 6 Click
Update Sitebutton in the footer to update the changes. You now have a fully functional form.
Spam Filter
By default we run a spam filter when a form is submitted and if a form submission gets flagged as spam we will show the user a captcha before storing the submission.
As an alternative to this you can use a honeypot field to trick spam bots.
To take advantage of this, just add a netlify-honeypot attribute to your form with the name of your hidden field. Then make sure that field is present in the form, but hidden via CSS or JavaScript.
Here’s a simple example:
<form name="contact" netlify netlify-honeypot="bot-field">
  <p><label>Email: <input name="email"></label></p>
  <p class="hidden"><label>Bot field: <input name="bot-field"></label></p>
  <p><label>Message: <textarea name="message"></textarea></label></p>
  <p><button>Send</button></p>
</form>
Ajax Form Submissions
You can submit forms over Ajax as well, just use the action attribute of the form as the target for the Ajax request.
Note that we add a hidden field to the form called form-name with the name attribute of the form. Make sure to include this in your Ajax request.
Here’s a simple jQuery example:
$("#my-form").submit(function(e) {
  e.preventDefault();

  var $form = $(this);
  $.post($form.attr("action"), $form.serialize()).then(function() {
    alert("Thank you!");
  });
});
NOTE:
Now if someone enters any value in the bot-field, netlify will quietly discard the form submission.